Wednesday, November 11, 2015

Halloween Costumes Through the Years

Celeste's 1st Halloween, 2007

Our family has always enjoyed theme-ing (is that a word?) our costumes for Halloween. Sometime around early September (if I'm lucky) or early October (not so lucky) we decide what we want our theme to be for the year. I then begin the hunt for appropriate items from our own stash, local thrift shops, and with friends and start assembling a "costume pile" for everyone. 

As the time crunch approaches and there are items that I cannot locate it comes down to having to sew, glue, or otherwise finagle them from materials on hand. I thought it might be fun to share a look at how they have come together over the years.


Little Red Riding Hood, 2009
Okay, so that first Halloween I just wanted to make my little girl all pink and pretty. We wanted to do "the Princess and the Pea" and daddy was going to be a mattress and mommy was going to be a pea, but in the end all we had was a princess and a couple of worn-out first Halloween parents.

2009 worked out a bit better with daddy wearing a homemade "wolf suit" (that now does service as an occasional dress up item for "On the night Max wore his wolf suit and made mischief of one kind, and another..." ) and mommy in her "granny" outfit, and a simple, adorable Little Red Riding Hood.

I cannot seem to locate my 2010 photo, our last Halloween together. We were The Wizard of Oz. Daddy had a full Cowardly Lion costume, Celeste was Dorothy of course, Mommy was the Scarecrow, and little Ethan joined us for his first Halloween as To To, complete with black furry costume and was carried around in a picnic basket (since he weighed a hefty 5 lbs at that time), in which he slept the whole time.

The Wizard of Oz, 2011 (plus a friend's ninja)
2011 marked the first Halloween without Andrew. I was really feeling overwhelmed. I wasn't even sure I wanted to do Halloween much less worry about themes. But we had just watched Alice in Wonderland and it was still fresh in our heads as we approached that time. The costumes seemed simple enough and so it was very last minute to throw it all together. Celeste, of course, is Alice. Ethan was the White Rabbit (more out of a need to use materials on hand and keep him warm since he'd been ill, than because of his own choice.)  He even had a little pocket watch. I was the Queen of Hearts of course.


The Incredibles, 2012
In 2010, before Andrew passed, we had decided that we were going to theme as the Incredibles the next year. It was a tough decision to do it without him, particularly since his "fit" as Mr. Incredible was so perfect, but Celeste was still very hung up on the Incredibles and overall I was feeling pretty Elastigirl myself in managing to hold it all together, and Ethan was excited to be "Dash", so in 2012 we went ahead and did the Incredibles.


The next year we were hung up on Dr. Seuss and wanted to do something from his works but I talked it over with Celeste and she didn't really like "The Cat & The Hat" (which would have seemed like a natural fit). Instead she wanted to use her favorite story about the Sneetches. Now trying to make a "sneetch" was probably one of the more difficult costuming challenges I've faced. Not only is it not a super popular story like some of the other Seuss stories, but Sneetches aren't even human! Only those familiar with Dr. Seuss recognized what we were, but we did win accolades at the Homeschool Character costume contest. :) I used 6 yards of bright yellow fabric and these are the first costumes that we've ever done that were 100% homemade.

Star-Bellied Sneetches, 2013
Civil War Re-Enactment, October 2013
These were during the same time period, but were not for Halloween, though admittedly I considered "cheating" and using them for both. It certainly would have been easier considering I was making TWO sets of costumes at the same time! These were our Civil War Reenactment costumes. We go to a 3 day long reenactment about an hour away every fall to watch the battle, learn some history, speak with the actors, and visit a beautiful part of Kentucky along the Mississippi river. Every year I've eyed the other visitor's and actor's costumes and thought "some day I am going to make some of those" and finally just decided this was the year. What initiated it was finding this hideous dark blue 1980's vintage long prom dress at a local thrift shop that week on sale for $3. I could just SEE it reborn as a Civil War era gown! 


Peter Pan with Kent, 2014
In 2014 I was introduced to Kent, my best friend's uncle, at a family barbecue to celebrate her graduation from college in July. Since that time he has become a wonderful part of both mine and my children's lives. That first Halloween together he readily agreed to dress up with us so that we could do a full Peter Pan cast. He was Captain Hook, Celeste was Tinkerbell, Ethan was John Darling, and I was Peter Pan. (Hey, in the early days Peter Pan was always played by a woman!)

Inside Out with Kent, 2015
This year (2015) the movie that stuck with the kids was Inside Out. Celeste just HAD to be Joy, and Anger was a perfect fit for Ethan. Once again Kent joined us as Fear, and I must admit I thoroughly enjoyed being Disgust. The costumes were fairly easy with adaptations to ready-made items except for mine. Apparently they do not make plain green dresses for women. So I used a pattern that I had on hand and actually sewed my own dress from scratch. I was pretty pleased with myself as I HATE sewing clothing from complex patterns, until I went to put it on and the darn thing wouldn't zip! I had to rip out seams and add some additional fabric to get it to go on - oh well... another year down - I wonder what's next?!


Monday, September 21, 2015

Scrappy UNQuilting

Scrap Happens

In my line of work, let's face it I generate a lot of scraps. I also totally try live by the philosophy of "waste not; want not". So what happens is bags and boxes full of scraps in my sewing room.

Admittedly I have such an issue (Repeating softly to self: 'I am NOT a fabric hoarder, I am NOT a fabric hoarder...') with this that they often overflow into my bedroom, my children's bedroom, closets, places like that. When they begin to make appearances in more public domain's like my kitchen and my living room I decide it's time to do something with them all.

To that end I have striven to come up with ever more smaller, useful products that I am able to then offer to my customers. For example all of my PUL scraps now see new life as waterproof pouches and snack bags. If they are too small to be pouches I try to use them to create decorative wings for my training pants and diapers. My wool scraps get cut up and used to make nursing pad backings and patchwork woolies. Other fabric scraps such as my flannel have become interlabial pads and (NEW) facial rounds, which is about as small as you can get.
My Scrap-Sorting Center
Yet even reusing as much as feasibly possible I still end up with boxes and boxes of small scraps that I simply cannot bear to throw away.
Now look I'm just going to be honest, I do not have the time or patience for old-fashioned quilting. The cutting the little tiny seams, ironing between each piece, pinning, ugh! it's just not for me. While I certainly admire the beauty of these quilts and the women who make them, I simply don't have the patience or time to do them. I have even tried crazy quilting where you don't have to cut the pieces exactly, unfortunately you still have to iron between each sewing and pin when necessary and other things like that.

I like to have a project that I can see the outcome of very quickly it helps me to gain momentum for completing it.To that end I developed a completely new style of quilting. Well OK it's hard to claim that my anything is completely new anymore because as we've all heard there are no new ideas under the sun. However in all of my Internet searches for an easy way to use my scraps I have never encountered this method of quilting.

Basically I simply overlap two scraps of fabric about a half an inch and use a decorative stitch to sew them together. Think of the outcome as something between a crazy quilt and I rag quilt.
The result is that you have the artistic flexibility in your quilt top that you would get with regular quilting while having the ease of production you get with the crazy quilt. 

Two Rows of Scraps joined with seam on reverse
It helps that most of my scraps are in the form of narrow strips or irregular blocks. This means that I can assemble the quilt top in rows. Then I simply fold them over on themselves and cut them so they are actually the same width/height along the whole row. Then I sew the rows together to the length that I desire or the width of my quilt. 
To further simplify things, I prefer to back these in fleece or with two layers of flannel or sometimes even just one layer of flannel for a very lightweight quilt. I find it it's a lot easier to tie off on fleece or to quilt through flannel than to try and have three even layers with batting in the middle. 


Close Up of Quilt Top


The MamaBear Workshop

Heart of the Sewing Room: The Cutting Table

Into the Fray

So I know there are some curious people out there wondering how all this sewing magic happens... (okay so maybe not, but I'm going to share anyway). After we sold our large farm we traded a lot of land and a small house for a larger house on a smaller bit of land. 
Stock shelves and sewing centers
Our new home has 4 bedrooms, one of which is dedicated to my MamaBear Workshop. 

So I've finally come to peace with the mess. I officially "clean house" about twice a year, going through items that didn't make the cut and selling off or donating them, washing the carpets, reorganizing, etc. The rest of the time I maintain a bare minimum of decluttering to allow me to fill orders and complete projects.

Oh sure, I've seen (and drooled over) those "sewing rooms" posted by other hobbyists - they are cute, pretty, and seem to me to never be used. My room is a workhorse that serves one function: to complete and ship out about 3,000 orders a year!

Fabric in Totes
Two Homemade Fabric Racks Dominate the Space
It wasn't long after moving to our new home that I realized my work had outgrown my space, and so I also had a garage built about 50 yards from the house which serves as my primary fabric warehouse. There are shelves on the walls for fabric in totes and small bolts as well as 4 racks for rolls of fabric. Needless to say it doesn't have much room for actual "garagy stuff" in there such as my tools, which stay crammed in a corner until I have to dig them out and make use of them.


In these two admittedly cluttered and stuffed spaces is where all the magic takes place - from designing and testing prototype patterns, picking through fabrics to meet custom requests, cutting, sewing, and stocking all my products, and packaging and shipping them to their new homes.
I thought you all might like to see some of that process (and mess) here. Just be forewarned: it takes a little chaos for great things to happen. :)


Orders all packaged and ready for their new homes.

Monday, September 14, 2015

Getting Over Ewww! Mama Cloth Usage

The "Ick" Factor

One has to wonder where our ideas about what is "gross" came from - I mean for thousands of years there were NO disposable items. We washed and reused EVERYTHING: from dishes to diapers, including menstrual cloths.
It wasn't until about World War II that the concept of disposable menstrual products came into being. These early pads were born of the same cottony gauze concept that brought sterile bandages to the field for soldiers. Early on they were seen as a luxury item, one only the very rich could afford. I mean the idea at the time was "who on EARTH would want to throw something away every time it's used"?!
Now our thinking has gone so far in the other direction that when the salespeople who cut my fabrics are asking what I'm going to do with all that flannel and I tell them they often actually SHY AWAY from the BRAND NEW fabric. Like somehow what they are GOING to be used for soils the new fabric! Seriously!
But I won't preach, truth is that most of us, myself included, have developed a lower "ick" factor tolerance. We are squeamish about things we shouldn't be, and perhaps not about the things we should... okay, I said I wouldn't preach...

So what is Mama Cloth and Why and How do we use it?

Mama Cloth or Cloth Menstrual Pads, are simply fabric designed to absorb menstrual flow, be washed after use, and used again. They can also be used for incontinence of both bladder and bowels to protect undergarments and maintain hygiene.

For most of human history such cloth has been simply cotton or linen that is folded to the appropriate size and fastened or held in place with garments or ties. Once menses is ended the fabric is then washed and dried and saved for reuse. Now cloth options come with all kinds of new choices in terms of materials (cotton, bamboo, linen, wool, fleece, PUL, etc.), colors and prints (who says your period has to be boring?), and modern fasteners such as buttons, snaps, and velcro. They are often shaped to fit inside undergarments and to be more comfortable for the user.

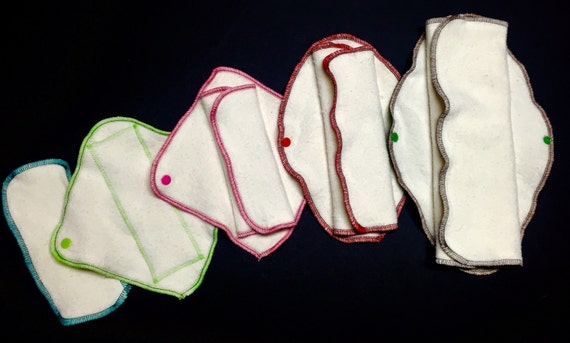
Just like their disposable counterparts, most pads come in an array of absorbencies and sizes. MamaBear size options include: Intralabials, Dailywear Wingless, Dailywear, Small/Medium, Medium/Heavy, and Heavy/Overnight/Post Partum.

The most important factor in reusing cloth products and reducing the "ickiness" is cleanliness. You want to be able to get your cloth items completely clean. Understand that "cleanliness" doesn't necessarily mean without staining. Staining actually alters the color of the fibers, so an item may be stained and still be clean. If staining bothers you or cranks up your "ick-o-meter" you might try purchasing only cloths that are dark in color. Black, red, brown, navy, etc. will likely not show staining. Also high contrast prints have good stain-hiding power.

You also have to remember that the thicker an item is the more difficult it will be to get the center layers both completely clean and completely dry. Dryness is important to both the longevity of your pads and your personal health. We all know what happens when fabric sits damp for prolonged periods - molds, fungi, and bacteria all thrive in moisture. You do NOT want to put that against your privates ladies! That's why many Mama Cloth items are designed to stack or layer for use and come apart for washing. MamaBear LadyWear Cloths unfold completely to be only a few layers thick which makes them wash and dry completely and in a much shorter time. Other options have separate pieces that you use to create the absorbent layers, but then you have to keep track of more parts for your system, although they do allow you to customize absorbency to meet your needs.

Washing and Care of Mama Cloth

The best way to handle cloth menstrual products is to use a Soaking Pot. This is any small container filled with cold water that you place your used pads into until you are ready to wash them. Then simply dump the whole container into the washing machine and wash on normal (cool/cold or warm/cold) wash cycle & dry in the dryer or hang in the sun. You might want to change the water daily during your cycle but this is not necessary. For daily use of pantyliners you could just wash them with your regular laundry (though be sure NOT to use fabric softener).

For Quick-Dry pads like MamaBear's you can wash them every evening or after each use & hang them over a warm vent or lay across a towel to dry in a VERY short time so you can reuse them. If you hand wash only you might want to run your pads through the dryer briefly at the end of each menstrual cycle to re-soften them for next month!

There are some Basic Laundry Rules that should be followed wih Mama Cloth:

NO: heavy perfumes or laundry soap, No fabric softeners! No sheets, no liquid, none added to your detergent. The added fabric softeners & the laundry soap cause the pads to become moisture repellent.
NO: Bleach! Bleach eats fabric & will wear out your pads fast. Instead try adding a little lemon juice to your wash (nature’s bleach) or dry your pads in the sun (nature’s most powerful bleacher). To keep them soft toss them in the dryer for a few minutes before or after line drying.
YES: Believe it or not the best laundry detergents to use on cloth menstrual pads are the cheapest! These typically have no additives, perfumes, or the like. My family uses SUN brand for our cloth pads & diapers.
YES: Strip your menstrual pads occasionally. (Typically once or twice a year is sufficient.) You can strip them by adding OxyClean, Petzyme, Pure White Distilled vinegar, or baking soda to the wash. Each of these has different properties and so rotating through a couple of them seems to work best.

Wednesday, September 9, 2015

BabyWearing in a Ring Sling

To get started you will need to put the ring sling on. You do this by laying the rings over the shoulder of your choice. Tuck tail up through both rings, then bring back down through top ring only (think of this like one of those 1980’s belts with the two D rings).


This should leave you with a tail (mine is short in this picture) with which you can loosen (by lifting up the top ring slightly while pulling on pouch) or tighten (by pulling on tail). You will have a pouch of fabric at the side opposite the shoulder where the rings are. 

Your child will sit up (shown at right) or lay down (cradle carry shown below) in the pouch of fabric either on your front, slid down to your hip, or slid all the way around to your back (carefully and only in sitting position, NOT in cradle carry). For older children their legs may stick out beneath the pouch and the fabric may be pulled up to below their shoulders so their arms can be free to move. For newborns and babies who do not yet have good head control they should either be laying down in a cradle carry (shown at right) or have their legs “frogged” up in the fabric (folded as if they were sitting) and the back of the fabric up over their head for support. 

Thursday, August 20, 2015

Today's Homeschool Project - Decorated Canvas Shoes

Today Ethan was staying at grandma's house making it a perfect day for a special project with Celeste! (I find that 5 year old boys don't really have the patience for intensive artwork, lol). 

So today we decorated our own plain white (read: "cheap") canvas shoes with permanent marker (and glitter). 

I'd seen these pop up on Pinterest and other places on the web and thought it would be a great project if we ever had some big kid time (okay, so I'm really just a big kid too). I mean we had to do something with the HUGE pack of awesome permanent markers we got on sale at the beginning of the school year - we were just dying to play with them!

What fun! Very easy to do, even with little kiddos so I thought I'd share. We used Mod Podge (the miracle adhesive/sealant/craft glue) to affix the glitter. Celeste created the tie-dye blended effect on her shoes by coloring spots with a Permanent marker and then "bleeding" them by dropping rubbing alcohol onto the dots and rubbing them lightly. 

Of course there are TONS of Pinterest and other examples on the web too for ideas! I used a couple of different Dover coloring books for inspiration and Celeste stuck with her current love of rainbows, sparkles, and all thing bright and beautiful.


Tuesday, August 18, 2015

New MamaBear Giveaway: Luxury Wool & Bamboo Nursing Shields

If you haven't already joined us on Facebook you might want to! I host frequent giveaways for my fans. To enter my newest giveaway simply click HERE!

Contest Open 3/18/15 to 3/24/15

Monday, August 17, 2015

Repurposing Clothes for Kids


I originally wrote this for the Etsy Cloth Diaper blog on Thursday, January 3, 2013 and have updated it here for you. 

Repurposing Clothes for Kids

Upcycled Play Pants
There are many words for it: "repurposing", "upcycling", "altering", but what we're really talking about is taking something that is no longer needed and turning it into something it wasn't originally designed for. There are a number of benefits to repurposing things, and with practice you will start to realize that you are seeing everything you own in a whole new light as you begin to see the other "purposes" an item may have after outliving its usefulness.

While just about anything can be repurposed, in this article I'm going to focus on repurposing old, worn-out, or poor-fitting clothing into adorable and useful items for children. 

Repurposing can be as simple as using an item in a whole new way, such as this tutorial for using an adult t-shirt as a no-sew, pinnable diaper just by folding it!
http://sarawharding.hubpages.com/hub/The-No-Sew-T-shirt-Diaper

Or as complex as using large adult items to lay out actual purchased sewing patterns on to reclaim fabric. Personally, I prefer something in between, and I've included a few of my favorite projects with basic directions below.

Some of the benefits of repurposing to make new clothing items include:
~ Less trash, less waste
~ Give new life to loved articles
~ Your child's clothing will be unique
~ Great for play clothes! The fear of destruction is significantly lessened when you know the item was a t-shirt headed for Goodwill or the dump to start with!
~ QUICKLY make clothes, because you'll find creative ways to avoid hemming and other time-consuming tasks by making use of existing hemlines and garment structures such as pockets, pleates, and zippers.
~ Save money on kids clothes

So here are some quick ideas to get you started on the "repurpose" road:

Quick & Easy 5 Minute Play Pants:

Materials:
~ An old turtleneck sweater or shirt
~ You could also use any old sweatshirt, long-sleeve t-shirt, sweater or other adult long-sleeved top made of stretchy material and 1/2 to 1 inch elastic, as long as your child's waist is around for a waist band
~ A pair of your child's pants, preferably loose-fitting
~ A sewing machine or serger (though I suppose you could do them by hand if you have the patience for that kinda' thing)

Optional: A cutting mat and cutting blade, which make this SUPER quick, but a marker and scissors will work too.

Sleeve on Adult Shirt Stretched Out
Lay the top down, stretching out the sleeves as shown. 

Lay the pants on top, folded in half and lining up the outer seams and cuffs (to avoid hemming).
Cut around the pants:
Existing Pants Used as Pattern
Using the pants as a pattern, cut or trace and cut around the outline of the existing pants, leaving a slight space for seam allowance. You can also easily upsize by laying the existing pants further up the sleeve and/or cutting with a greater allowance. If you are using a turtleneck you do not need to allow extra fabric for an elastic casing as the neck will serve as the waist for most children. If you will need an elastic casing allow an extra 1-2 inches of fabric at the top above the waistline of the existing pants so that you can fold that over and make an elastic casing. Another option, if the sleeves of your garment are too short, is to cut a casing from another area of the garment such as the hemline at the waist, and sew it to the pants.
Cut Out Pattern


Lay one cut sleeve on top of  other

Cut sleeve laid on other sleeve.

Now repeat on the other sleeve, using the half you just cut and cutting on the line so that they are the same size.

Test neck sizing, turtlenecks.
Measure Turtleneck Opening
If you are using a turtleneck (and the neck is large enough for your child's waist), you can simply cut it off at whatever height you'd like your waistband to be. I like high-rises on my little guy to cover up his fluffy cloth diaper butt so I used the whole neck.
All 3 pieces laid out


 This is the only "tricky" part of the whole process - you want to be sure that you do not sew one sleeve inside out and the other right side out or end up with the seams on the outside of the pants.
One "sleeve"/"leg" inside the other.
To assemble, turn one sleeve inside out and leave one right-side out, shoving the right-side-out one into the inside-out one and lining up the area cut for the crotch of the pants. 


Crotch seam sewn with serger.
Sew seam at crotch from front to back: Starting at one end sew or serge along that seam from one end to the other, being certain that the seams in the middle (if there are any from your garment) line up with one another. You will end up with a big "U" shaped seam. If you use a stretchy material and do not have a serger be sure to use a zig zag stitch to provide some easing for the pants.

Now, turn the pants so that they are inside out. Line up the neck (I hate pinning so I just eyeball it, but pinning would ensure a good even stretch all around), with the raw edges on the same side and the neck INSIDE the waist of the pants. Serge or sew, stretching the neck to fit the waistline and gather the material lightly.
 
Turn right-side out and voila!

Other Possibilities:

Cutting out from adult pants.


Cutting out from a T-shirt
You could also easily make these from a wool sweater to use as a cloth diaper cover!


Some other great repurposing ideas:

 
Dress from a women's sweater. Found at: http://www.seven-alive.com/little-girls-sweater-dress-up-cycle/
Child's skirt from T-shirts. Found at:
http://www.tipjunkie.com/all-crafts/repurposed-pattern/

                                                    Or how about UPSIZING?
Turn tiny newborn clothes into something usable. Found at:
http://www.sewcando.com/2010/03/newborn-to-new-size-clothes-tutorial.html